By Shelby Steiner
Many options for imaging a hard drive on a Windows 10 system exist, but in the interest in keeping things simple, I've decided to direct you wonderful users to the built-in system imaging tool featured in the operating system. It may not be the most robust software software on the market but I have two important reasons for this:
- It's free
- It isn't a pain to use
- A USB Flash Drive with a minimum storage space of 16GB
- An internal or external hard drive (HDD/SSHD/SSD) with enough space to contain the entirety of your system
The second part is rather important. The type of drive that you choose to use for your system image is largely irrelevant, but the amount of space used on your system will dictate the amount of space required on hard drive you will be storing your system image on. For instance, if you have a 1TB hard drive in your computer (as I do), but you have only used 250GB of space, you will only need a hard drive large enough to hold the used space. A 320GB external HDD would be more than adequate in this case. Attempting to use a hard drive that is too small will not work, even if you have multiple drives.
I suppose you could use CD/DVDs for storing your system image, but I have no idea why you'd want to do that.
To be able to create either a system image or create a recovery drive, you will need to first be able to located the necessary menus. This portion of the Windows 10 Backup Guide will facilitate that process for you.
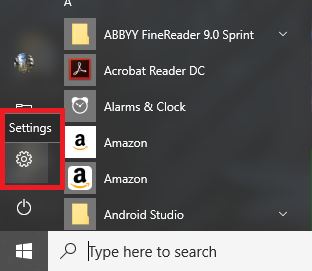
1. Go to the Start Menu, and click the Settings icon
2. Click on Updates & Security

3. Click on Backup tab, then Advanced Options
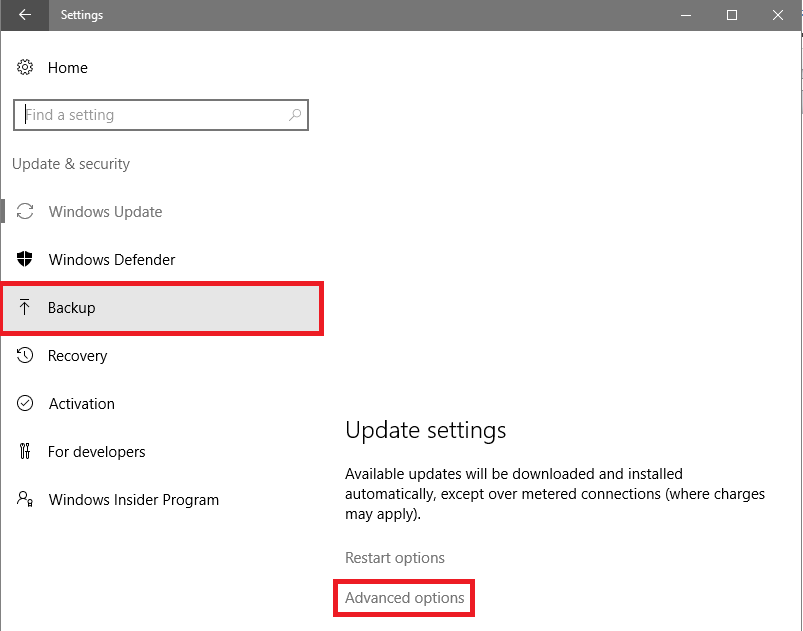
4. Click See Advanced Settings

From this point, you'll be able to find the start points for both the Recovery Drive Utility Tutorial and the Default System Imaging Utility Tutorial.
Continue from Step 4 of the Navigating To Backup Options guide.
For this part of the guide, you will need access to your USB flash drive and have it interfaced with your system. Please refer to the What You'll Need tab for additional information.
Note: Your USB flash drive will need to be empty, or you must be willing to format it. All information on the USB flash drive will be lost, so be sure to copy any important data over to another location.
1. Click Recovery

2. Click Create A Recovery Drive

3. Select A USB Flash Drive

Once you’ve located your USB flash drive, select it and click Next.
4. Confirm Formatting

Ensure that your USB flash drive is ready to be formatted. Warning: Formatting your USB flash drive will erase all data on it. Using an empty USB flash drive would be preferable. To continue, click Create.
5. Wait

Once completed, you will have a Recovery Drive USB in case your Windows 10 system cannot properly boot up. From that point, you can restore the system and make use of the system image you'll create in the next tutorial, Default System Imaging Utility Tutorial.
Continue from Step 4 of the Navigating To Backup Options guide.
For this part of the guide, you will need access to your internal or external hard drive and have it interfaced with your system. Please refer to the What You'll Need tab for additional information.
For this part of the guide, you will need access to your internal or external hard drive and have it interfaced with your system. Please refer to the What You'll Need tab for additional information.
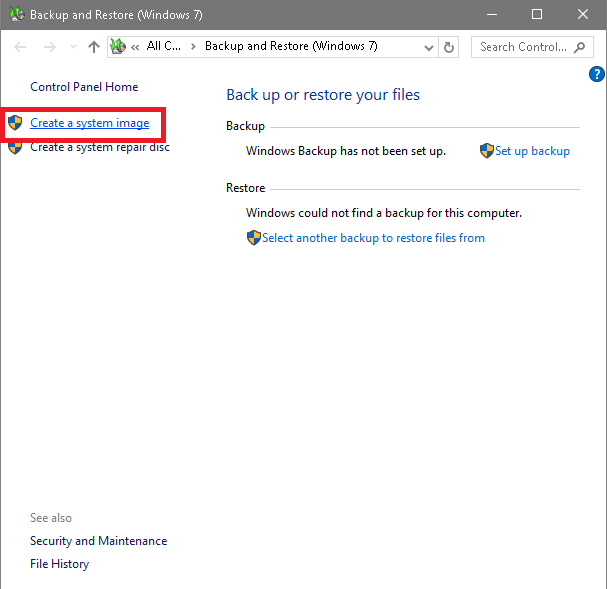
1. Click System Image Backup

2. Click Create A System Image
Once this option is selected, the system will attempt to locate a suitable storage device to create the system image on. Simply wait for the search to complete before attempting to move on to the next step.
3. Choose a storage device

Select the appropriate storage device (such as your destination hard drive), and click Next.
4. Confirm Settings

Once you’ve confirmed the settings for your system image creation, click Start Backup.
5. Wait

The steps have been completed to create the system image. Simply monitor the progress as needed, to ensure that the process is carried out in full. Do not remove your storage device during this process.
Once completed, you will be prompted to create a system repair disk. If you choose to create a system repair disk, just makes sure your PC has a DVD-RW drive and you use a DVD-R or DVD-RW disk. However, if you completed the Recovery Drive Utility Tutorial, this will not be necessary.
Once completed, you will be prompted to create a system repair disk. If you choose to create a system repair disk, just makes sure your PC has a DVD-RW drive and you use a DVD-R or DVD-RW disk. However, if you completed the Recovery Drive Utility Tutorial, this will not be necessary.
